How To Creat A Bootable Usb For Mac
There are various ways to boot macOS. Aside from using the built-in Startup Manager, you can also boot into Verbose, Safe, and Target Disk modes. In addition to this, macOS users also have an option of picking a disk to boot the operating system from.
Follow these steps: 1. Using a Mac with at least OS X 10.6.8 installed, access the Mac App Store and download the Lion (10.7) or Mountain Lion (10.8) app installer. Insert the USB drive into the Mac and launch Disk Utility. Click on the USB drive from the left-hand menu and select the Partition tab. Part 4: Create Bootable USB Windows 10 on Mac with UNetbootin Step 1. Like other method 1, you can also need to check the path name of the USB drive. Now, you need to download UNetbootin tool then install it on your Mac, launch it. In the panel, select the USB drive in the Type.
But let’s delve into something more specific. You’re about to find out how to boot your Mac up directly from external storage, specifically flash storage or a USB-based flash drive.
Related:Create bootable flash drive for Windows 10.
Why You Need to Boot from External Drive?
Cd drive for mac high sierra 10.13. There are many occasions you may have trouble with your Mac.
- Corrupted system files and Mac crashes unexpectedly.
- Mac runs very slow with sufficient storage.
- You have deleted some system files wrongly.
- You couldn’t login to your Mac.
- Troubleshooting purposes.
Let’s begin with the obvious question here; what are the basic requirements for creating bootable USB for Mac?
How to Create Bootable USB Drive for Mac?
- USB drive with sufficient storage space.
- Access to a working and supported Mac.
- Format USB to Apple supported file system.
- Get installer file for macOS.
- Create bootable USB.
- Booting Mac from Startup Manager.
If you are not able to login to your Mac, you need to use Time Machine backup disk. Otherwise you should have another Mac for creating a bootable USB.
1. USB Drive
The macOS installer file is large with approximate size of 6 to 10GB depending upon the version. Also the process needs to sufficient storage space on your USB. So ensure to have at least 32GB or greater storage space on your USB drive.
Remember to copy and backup the USB since you need to delete the entire content for creating the bootable drive.
2. An Intel Based Mac
Apple transitioned to an Intel processors in 2005. In other words, if your Mac is not older than 2005, you should be fine.
3. Format USB Flash Drive to Apple File System
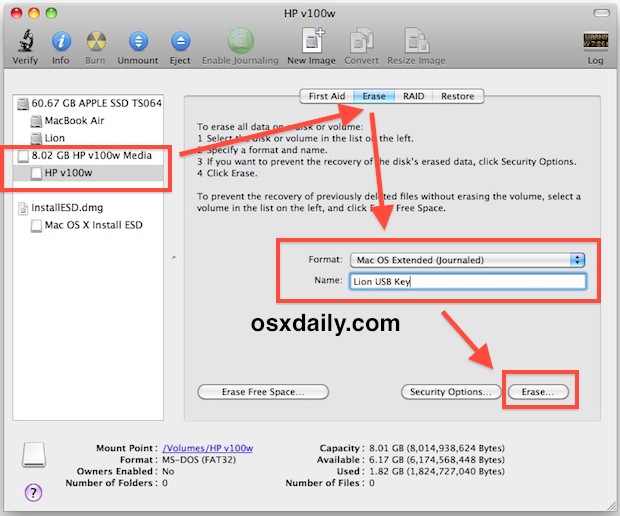
First, plug in your USB drive. Press “Command +Spacebar” to access Spotlight, then type “Disk Utility”. You can view the current file system of the USB drive. In our example, we have FAT32 file system which is compatible on Windows. You need to erase and format the USB to be compatible with your Mac.
Click on the “Erase” button on “Disk Utility” and choose the format as either APFS or Mac OS Extended. In most cases, your Mac will show the supported format by default and you don’t need to change it. On older Mac, you will see an additional scheme option, choose “GUID Partition Map”. Click on “Erase” button to continue further.
North Arrow Jpg Software JPG to PDF Converter v.3.2 JPG to PDF Converter is a software tool which can JPEG, TIFF, JPG, TIF, PNG, PCX, GIF files to PDF files, image to pdf converter doesn't need Adobe Acrobat software, it can convert image files to PDF files directly, free download available. North arrow jpg download for mac. Download free 2 North Arrow vector icons! +500,000 vectors and icon kits. Available in PNG, ICO or ICNS icons for Mac.
Disk Utility will delete all content on the USB and format it in the selected APFS or Mac OS Extended format.
Formatted USB Drive in Mac OS Extended File Format
4. MacOS Installer File
In order to create a bootable USB drive for Mac, you need download Mac OS installer. Open App Store on your Mac and search for the latest macOS version. Remember, App Store will only have the latest version which is macOS Mojave at this point when we write this article. Search for “macOS mojave” and click on the “Get” button.
This will start downloading the installer file to your “Applications” folder.
5. Creating USB Installer
After downloading, the installer will automatically ask you to install macOS Mojave. Simply quit the installer without starting the installation.
- At this point, ensure you have inserted the formatted USB drive, let’s say the name of the USB volume is “Boot Disk”.
- Also make sure the downloaded macOS installer file is in “Applications” folder.
- Press “Command + Spacebar” and search for “terminal” to open Terminal app.
- Copy and paste the below command in Terminal and hit enter.
sudo /Applications/Install macOS Mojave.app/Contents/Resources/createinstallmedia –volume /Volumes/Boot Disk
- You need to enter admin password to proceed further.
- Terminal will ask you to confirm erasing the volume, press Y and hit enter to confirm.
Ready to start.
To continue we need to erase the volume at /Volumes/Boot Disk.
If you wish to continue type (Y) then press return:
- Now the erase disk process will start to copy the installer file on the USB drive. After successful completion of the process, name of the USB drive will be changed similar to the installer file name like “Install macOS Mojave”.

Note that Apple discourages booting with an earlier macOS version than the version your device is shipped with.
6. Boot Mac from USB
Follow the below process to boot your Mac from bootable USB:
- Insert the bootable USB installer drive and go to “Apple Menu > Restart”.
- When your Mac restarts, press and hold the Option key till “Startup Manager” opens.
- The Startup Manager scans and lists the drives that are connected and bootable.
- Note that the Startup Manager will only list volumes that include bootable volumes. If you only see “Macintosh HD” like below then the USB drive is not connected to your Mac or not created properly with the installer file.
- Select your Wi-Fi network name from the “Choose Network…” dropdown and enter the password to connect to internet. Remember, you need to have an internet connection for installing from USB as the installer needs to get updates for your Mac from Apple’s server.
- Double click on your USB that contains the macOS installer or highlight it and press the return key.
- You will see macOS Recovery app and choose “Install macOS” option from Utilities.
- It may take long time depending upon your Mac to start booting with macOS Mojave.
Wrapping Up
As simple as the process seems, it tells you a lot about your system. For example, if a USB flash drive that contains a bootable copy of macOS doesn’t show up on the Startup manager, you may need to repair the disk permission. Also, remember to format the USB drive with a APFS or Mac OS Extended format.
That said, now you know how to boot up another version of or a copy of macOS and troubleshoot possible issues with your device.
Starting with Disk Drill 3, anyone can create a bootable Mac OS X drive in a matter of minutes. Make sure you have an extra storage device, which is at least 2GB in size. Connect it to any Mac, run Disk Drill and use the 'Create Boot Drive' option on the main toolbar.
Disk Drill let's you run all its data recovery algorithms via a bootable Mac USB drive. This ensures the maximum amount of data stays intact during the recovery process, and other background processes or the operating system itself do not overwrite any recoverable pieces of information. Please note: Disk Drill does not provide any option to create bootable CD/DVD drives due to them becoming less popular and accessible in modern computers.